

I am so excited to share this project with you! I created frames that you can use in two different ways.
1

2

My inspiration came from these adorable pictures that I took of my daughter and her cousin when they were 6 and 7 years old. This was taken at the end of our street.
We have since lost the dock and the grass dune from all the storms that hit our area.
So this is a nice reminder of how it use to look and of how fast our kids grow.

I wanted to do something special with these pictures for many years. I found this piece of beadboard in our basement.

The first step was to measure and cut. My husband did that part for me. He is very handy and always willing to help me out. My plan was to get at least 5 boards from this one piece of beadboard, but it wasn't large enough so I had him cut two large pieces. 16" x 16"
I sanded and painted it.

The paint was a free sample from Lowes

I purchased 6 unfinished wood frames (4" x 6" ) for a $1.00 each at Michaels

I glued two magnets on the back


After the stain dried. I painted the frames using leftover paint (Benjamin Moore White Linen).
After the paint dried. I sanded using 100 grit sandpaper. Now the frames have a worn beach look.
The second part of the frame is the layer that goes on top of the beadboard. I used foam board cut to size 10" x 10" and burlap cut 12" x 12". I glued the burlap to the foam board using a spray adhesive.

I cut pieces of metal and glued them to the burlap. This will hold the 4" x 6" frames.
The top of a tin can will work too.

You can purchase the rope at any home improvement store or boat marine store.

The final part of the project was to nail the picture hangers on the back of the beadboard. I used large self-leveling hangers on two sides. This way you can hang it horizontal or vertical.

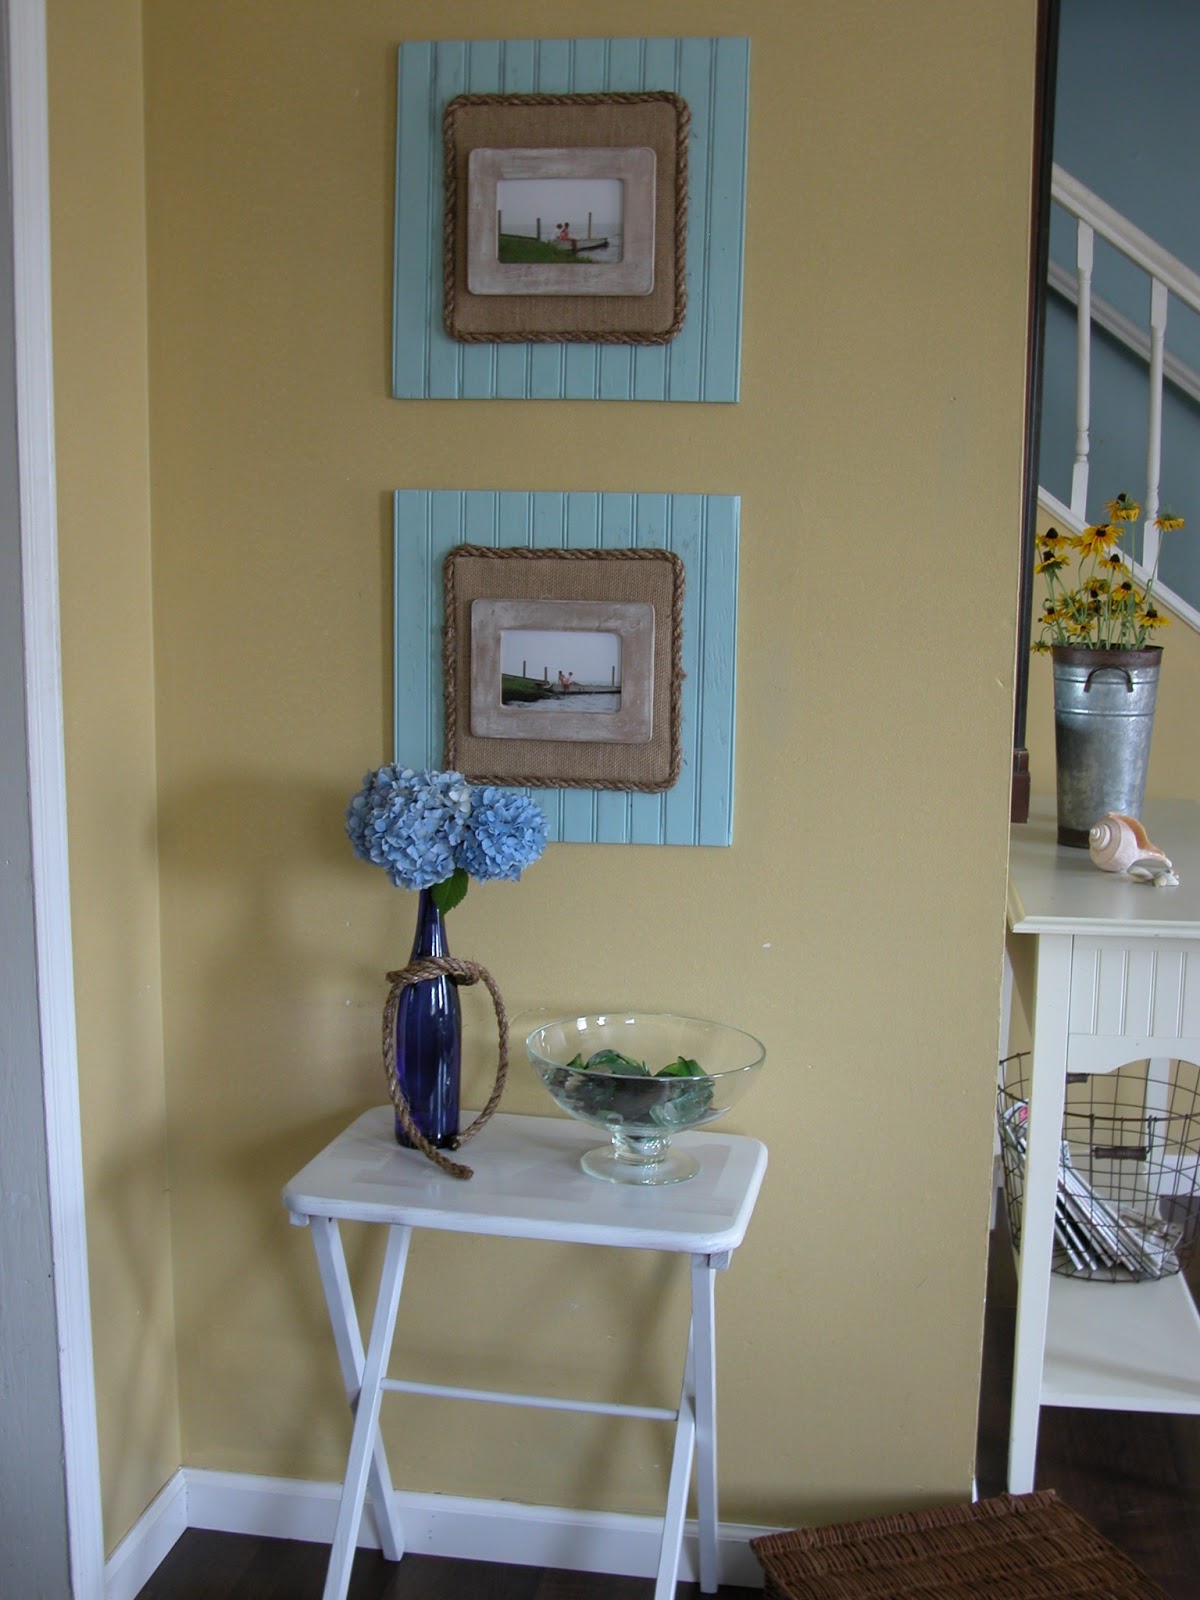
After that was complete I hung them on my wall in my living room.
Here the frames are hung in the vertical position
The TV tray was in my neighbor's garbage. There were two of them. I transformed them using a stencil method and spray paint. I'll tell you about that at a different time.


I tied the leftover rope around this pretty wine bottle added my hydrangea's and beach glass to a glass bowl for a simple summer look.


Here you can see the transformation of the unfinished frame.
HERE IS HOW YOU CHANGE THE PICTURE
Pull the frame off the magnets. Take out the picture and put a different one in.

Turn the board horizontal and return the frame.

NOW YOU HAVE A NEW LOOK


Here is another close up of the frame that I stained and painted


Isn't she cute! That was my daughter when she was 3 years old. She is now 14.
This is a great summer frame to capture all your summer moments or old memories.
Have fun and enjoy your summer!


Hi Julie! This is a fantastic idea. Love the bead board! Thanks so much for sharing our on link party! Have to give this a try - or at least it's making it to the list of wonderful ideas...... one day!
ReplyDeleteAll the best!
Sharon and Denise
Julie this is such an awesome idea. I love the frames. This is such an awesome post. I would love it if you would share this post at our WIW linky party. Hope you can join us today!
ReplyDeletePaula
ivyandelephants.blogspot.com
I love beadboard in frames--these are great!
ReplyDeleteWhat a great idea, these are the cutest frames! So great that you can use them two ways. Your little girl (well, big now) is precious!!!
ReplyDeleteThanks so much or sharing at Amaze Me Monday, hope you'll hop back over for this weeks party!
Blessings,
Cindy
Really beautiful frames! Featuring these at the party tomorrow! Thanks so much for sharing!
ReplyDeleteWhat a FANTASTIC DIY!!!! Thanks so much for sharing...they look amazing! hugs...tfs!
ReplyDeleteWow, great job! although I'm creative with most of my home, I'm horrible about not doing anything creative with our photos. Oh dear! They're all stuck in cheap frames that I don't like! Must remedy that. Thanks for the inspiration! ♥
ReplyDeleteVery nice and so pretty. Love it on that wonderful color wall. Great idea with the magnets. Can change out pictures easy. Thank you for sharing.
ReplyDeleteJulie,
ReplyDeleteI love the layered look of these frames and that is such a good idea to create them to hang either direction. Great job! Thanks for sharing this at the Inspiration Gallery!
~Sarah
These picture frames look wonderful. It's nice to have memories of things that are no longer. Nice finds with the free paint and $1 frames. Thanks for sharing.
ReplyDeleteKatie @thecasualcraftlete.com
Hi Julie,
ReplyDeleteVisiting from The Inspiration Gallery. Your frames are so pretty! I love the combination of materials you used, and the pretty blue of the beadboard. Your photos are precious :)
Jeanette
Creating a Life
The layers really make the framing special. Love the whole look! Glad I participated in Blue Friday to see this!
ReplyDeleteThe frames are absolutely beautiful and the children are so precious. I love this idea. Thanks tons for joining Inspire Me. Hugs, Marty
ReplyDeleteBeautiful Julie! I love the pics! What a great project!
ReplyDeleteJen
Great project and great tutorial! I'm going to Pin it. I think many others would like to make these. And your daughter was such a cutie!
ReplyDeleteThank you for linking up with Sunday View.
Laura