Showing posts with label DIY
Hi sweet friends, welcome!  Last week I've been busy cleaning out closets and organizing our kitchen, two exhausting tasks that challenged me mentally.  During the big clean out,  I found items I wanted to keep, donate, and upcycle. One of the items I decided to upcycle was a square wall clock that no longer works.  Right away I knew it could be a cute picture frame.  At first, I was going to place one of my photographs inside it, but I didn't have one that would fit the frame, so instead, I printed out this sweet quote.

upcycle-a-square-clock-into-a-frame-love-my-simple-home
I think it looks adorable and fits perfectly inside the square frame. 
Read further on for this simple tutorial.

This post contains affiliate links


BEFORE

upcycle-a-square-clock-into-a-frame-lovemysimplehome.com

Materials:

1.  Square Clock
2.  White Card Stock
3.  Cardboard
4.  Screwdriver
5.  Ruler
6.  Pencil
7.  Scissor
8.  Computer
9.  Printer


Instructions:

Place the clock upside down on a flat surface and remove all of the screws using a screwdriver.


Use the screwdriver to pry off the back of the clock.


Discard the clock or better yet upcycle it!


Keep the screws to reuse for this project.


Measure the back of the frame mine measures 8"x 8".  Then measure and cut a piece of cardboard to the same size. This will be used on the back of the frame to hold the cardstock in place and also to keep light from passing through. 


Now pick a quote, it can be anything you decide on. Use Google Docs on your computer to create your printable. Choose the font that is most appealing to you and choose the size that will fit your frame. Then print it using your printer.


Cut the printed cardstock to the same measurements as the cardboard.


Place the printed quote upside down inside the frame.


Place the cardboard on top.


Use the screws that came with the clock and screw them back into the holes.


And that's it!  Now you have an adorable piece of art you can hang on your wall. 

I hope you enjoyed this simple upcycle and if you are looking for more upcycle and repurpose inspiration I have many here on my site so please go ahead and check them out under my categories page  REPURPOSE/UPCYCLE.            
AND 
HERE ARE TWO MORE IDEAS ON HOW TO UPCYCLE OR REPURPOSE A CLOCK:


upcycle-idea-upcycle-a-square-clock-into-a-frame-lovemysimplehome.com


Thanksgiving is just around the corner and I've been busy putting together three nature-inspired Thanksgiving place settings for you to use on your Thanksgiving table.

This post contains affiliate links


For me Thanksgiving holds memories of simple pleasures gathered around our dining room table. Every year I look forward to this holiday, not only for the delicious food but for gathering together as a family, sharing, laughing and catching up on our life stories together.  Today I will show you how you can put together three easy nature-inspired Thanksgiving place settings.   All you need to do is look outside your window.  I searched my backyard for colorful leaves and woody pine cones. You can even involve your kids in the search.  When my daughter was younger I would tell her we were going on an adventure to search for treasures.


To help you get started, I put each place setting under a different category.  The first one is simple the second is pretty and the third is country.  Choose which one fits your style and inspires you!

They are all simple to do!

SIMPLE


Make this Super easy Place Card in the shape of a house.  This will keep the little ones busy while you are preparing the meal.  


I created the place card using paint sample cards.  The cards have a triangular shape of a rooftop. To make yours simply fold and crease the bottom & write anything you would like, then stand the little house next to your plate. They are so adorable!  I found the paint sample cards at Lowe's.
Best of all they are free!

Fold a Cloth Napkin or Tea Towel lengthwise and place utensils on top.  Scatter hand-painted leaves around the place setting for a simple woodsy look.  Click here for my tutorial on how to hand-paint leaves.  Or purchase Preserved Leaves.


PRETTY


Roll a Cloth Napkin and tie with a Crochet Ribbon


Paint leaves found in the yard with Metallic Gold Fabric Paint and tuck a sprig of Dried Lavender under the ribbon.  If you do not have lavender you can use any flower clipping.


Place two leaves on the plate and one on top of the ribbon.


COUNTRY


Yellow gingham or Buffalo Check napkins add a country feel to this place setting.  Simply fold the napkin lengthwise then flip the bottom up and crease


Tuck two painted leaves inside and tie with a black ribbon.  Use a silver metallic sharpie to write on the leaves.  For added texture and a more woodsy touch add a pine cone. 

nature-inspired-Thanksgiving-place-settings-lovemysimplehome.com


Buy On Amazon


Thank you for stopping by...
I hope I inspired you to make your own natural place settings using any of my ideas!
Get your free printable in my previous post on How To Set a Table, just click HERE to get yours!

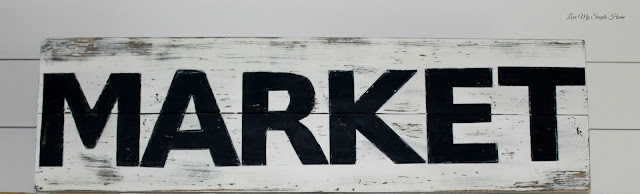
  I love large chippy wood signs.....

diy-ship-lap-market-sign-love-my-simple-home


diy-ship-lap-market-sign-love-my-simple-home


I made a MARKET sign with two boards that I found in the trash.  


HERE IS HOW I MADE THE SIGN:

First I cleaned the boards and gave them a quick sanding.  To make the shiplap I assembled the boards together and painted them black.  Using my computer I printed the letters M A R K E T on individual regular printer paper, then I cut each letter out. After the paint dried I positioned the letters on top of the boards.  Using white paint I painted right over the entire piece.

While the paint was tacky I peeled the paper letters off. This was a little messy and I had to go back and clean up the lines of the letters.  Once I was happy with how the letters looked, I distressed the sign and added a couple of hooks to the back for hanging.


diy-ship-lap-market-sign-love-my-simple-home


I placed the sign on the built-ins in our dining room and used natural elements along with white dishware on the other shelves. I love the farmhouse feel the market sign brings to our home.


diy-ship-lap-market-sign-love-my-simple-home


One of my favorite things to do in the summer is to walk along the beach and collect seashells, driftwood, and beach glass.

My collection of driftwood was the inspiration for this simple project!

how-to-get-the-driftwood-lool-for-your-frame-lovemysimplehome.com


BEFORE
To get the driftwood look for this white frame I used wood stain and craft paint.


This large frame was the door to our entertainment center.  If you would like to see how I repurposed it, you can read about it here.


HOW TO GET THE DRIFTWOOD LOOK FOR YOUR FRAME


The first thing I did was remove the glass.   I wanted a lighter frame to hang on my newly painted plank wall. 


Then I sanded the white paint, just to rough it up. I used weathered gray wood stain and burnt umber craft paint.


This is my own method on how to make painted wood look like driftwood:

SUPPLIES:
sandpaper 
foam brush
cloth
wood stain
water
latex gloves to protect your hands!

Using a foam brush, I brushed on the wood stain.  Then I rubbed the wood stain into the white paint with a soft cloth.  Next, I used a damp cloth and wiped some of the wood stain off.  I added more wood stain and continued the process.

Then let it dry! 


Here is what the frame looked like before I added the craft paint.  It's a pretty grey, but not weathered enough to look like driftwood.  


The final step to get the driftwood look is applying the craft paint!  I used a cloth to apply the craft paint.  I rubbed the craft paint into the stain and wiped it with a damp cloth.  Let it dry...

AND

That's it...Now I have the driftwood look! I added the doorknob from the entertainment center to cover
 the nail.

AFTER
how-to-get-the-driftwood-look-for-your-frame-lovemysimplehome.com

how-to-get-the-driftwood-look-for-your-frame-love-my-simple-home

Hi friends,  do you have a laminate top dining table that you want to paint but are not sure how to paint so it will withstand spills and messes?  I can help by showing you step by step how I painted mine.  This DIY project was easy to do but takes some patience!

how-to-paint-a-laminate-tabletop-to-withstand-spills-love-my-simple-home

I was looking for a round table that would fit the small nook in my kitchen. I thought this laminate top dining table purchased at a yard sale would be the perfect candidate for a makeover with a beautiful new finish of bright white paint.

BEFORE

Laminate Tabletop Material List:


Step One: CLEAN

The first thing you need to do is wash the table off.  Use a soapy sponge with water to clean all the dirt, oil, or grime off the tabletop and base.  Use a clean dry towel to dry it completely.

Step Two:  SAND


The purpose of sanding is to give the paint/primer something to grab onto.  Use a palm sander with 220 grit sandpaper and sand the top in the direction of the grain.  You don't need to sand too much, just enough for the paint to stick to.  After sanding, clean the surface again with a soft clean cloth.  If the base of your table is in poor condition go ahead and sand it too.   (You might find it easier to hand-sand the base of the table.)


Step Three:  PAINT

A table that will be used daily needs paint that is durable and can withstand spills. I recommend BEHR Premium Plus Ultra in an Eggshell enamel finish.  (You don't need an entire gallon, one quart is plenty.)  This paint is stain-blocking and is paint & primer in one.  For a super bright white, use Ultra Pure White.


Apply four thin coats of paint with a foam roller.  Wait two hours between coats.  Don't let the first few coats discourage you.  They will show the laminate underneath. Be patient, the end result will be a beautiful smooth finish.


This is what the table looks like after one coat:


Here is the same table after four coats: (Smooth as Butter)


If you are painting your base, use a paintbrush to paint the legs and other parts of the table that are not easily accessible with the roller.


Step Four:  SEAL

The final step to keep your table beautiful and help it stand up to spills is to seal it!  Use at least three coats of Minwax Polycrylic Clear Satin to seal the top of the table.

Using a synthetic paintbrush apply one thin coat and let it dry overnight (patience).  Then lightly hand sand with 320 grit sandpaper.  Clean off the surface and add another coat, wait two hours and apply the final coat (or more coats if desired).


Allow the sealer to harden for at least 48 hours.  Then start eating at your beautiful new table. 

how-to-paint-a-laminate-tabletop-to-withstand-spills-lovemysimplehome.com


Would you believe this table was an ugly laminate tabletop if had not seen the before pictures?

That's it, I hope this tutorial was helpful!

SHOP MY STOREFRONT ON AMAZON


© love my simple home · THEME BY WATDESIGNEXPRESS