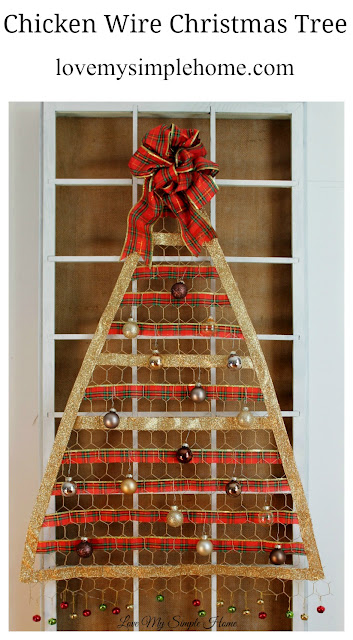
No floor space for a traditional Christmas tree?  Hang one on the wall!  This hanging Christmas tree made out of chicken wire is a great solution for small spaces.  It's a non-traditional Christmas tree that can be hung on a wall or door.  Just attach some ribbon and ornaments and you've got a festive tree! 

This post contains affiliate links

lovemysimplehome.com


SUPPLIES:  


Here is How to Make a Chicken Wire Christmas Tree:

First, unroll the chicken wire, now that is quite a task!  If you ever worked with chicken wire you know what I mean.  Every time I unrolled it, it rolled back up!  To solve this dilemma I placed each end of the rolled wire under the top side of my table and stretched it out. This worked and I was able to move on to creating the shape of the tree.  To do this apply painter's tape to the chicken wire in the shape of a triangle.  Use your wire cutters to cut the shape out {follow the tape line}. After that is complete your chicken wire should be in the form of a Christmas tree.

Next, go ahead and spray paint the Christmas tree gold, or if you like silver skip this part and leave it as is.


I wanted my Christmas tree to be gold, and this is what I used.


Now it's time to decorate your tree!


You can use any Christmas ornaments and ribbon that fits your style

Make sure your ribbon is 1 to 1- 1/2 inches wide.  I used Gold and red plaid ribbon, jingle bells, and ornaments to decorate the tree. The plaid ribbon I purchased 2-1/2 inches wide was too wide so I cut it down the middle to fit inside the links.  The 1-inch gold ribbon fits perfectly. 


Tie jingle bells on the bottom of the tree using thread. I plan on hanging my tree on my door,  I love the sound of the bells as the door opens and shuts.  My kitty thought the bells were fun to play with.  After the bells are hung weave the ribbon through the links.

Starting from the bottom weave your ribbon through the links going up every other link all the way to the top of the tree. (Cutting the ribbon to size as the tree narrows)   For the finishing touches, glue strips of ribbon along the edges, hang the ornaments and make or purchase a large bow to place on top.  


There you have it!  A Chicken Wire Christmas Tree for small spaces!  Go ahead and hang it on your wall and place all the lovely presents for your family and friends underneath.  Or hang it on your front door to greet holiday guests!


lovemysimplehome.com


lovemysimplehome.com
Are you fed up with the everyday clutter in your home?  You know, the shoes left at the front door that you always seem to trip over and the endless junk mail that lands on your dining room table. Let's face it, these things can slow us down and interrupt the flow of a morning routine.  It's happened to me way too many times. I needed to tackle this problem and find a solution.

simple-solutions-to-hide-clutter-love-my-simple-home


BEFORE
simple-solutions-to-hide-clutter-love-my-simple-home

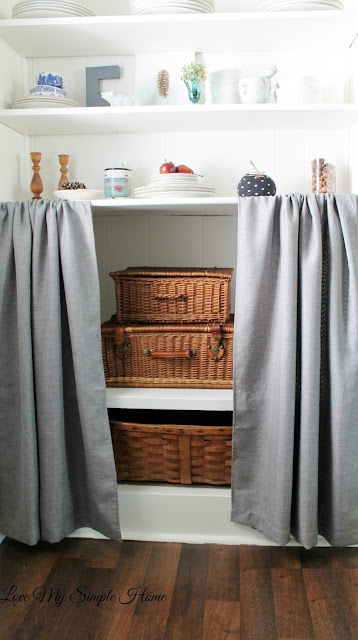
Finding the right location is the key!  This built-in is located just off the front door so it is the perfect spot to hide shoes and mail. I can use the bottom shelf to store shoes and boots and the top shelf to stack baskets for the mail and other miscellaneous papers.


HERE IS MY SIMPLE SOLUTION TO HIDE CLUTTER


I used two curtain panels, a tension rod, and baskets. 


STEP 1
Stretch one panel out on the floor.
  How funny, B thought I put this on the floor for her to sit on. 

While she is sitting there, let me introduce you to her.  We adopted B (yes that's her name) in August after our sweet Molly passed unexpectedly in July.  B loves to give hugs and is fast as lightning!  B just turned 6 years old and is my new blogging buddy. 

OK let's try again without B posing on top of the curtain.

Stretch the curtain panel on the floor


STEP 2
Hang the tension rod 


STEP 3

Pull each panel through the top of the tension rod.  Notice that my curtain panels have grommets, it is not necessary to use curtains that have them. However, I do like the added weight it gives to the bottom of the curtain after it is hung. 


Here is the first panel hanging from the tension rod.


STEP 4

Slide that panel to the side and pull the next panel on the tension rod. 


STEP 5

After both panels are on, adjust the length so they just skim the floor and are even at the bottom.


It's time to place the baskets on the shelf.


I used two baskets and stacked them one on top of the other.  The top one I will use for mail and the other for miscellaneous papers.  The shoes will go inside the basket on the bottom shelf.

simple-solutions-to-hide-clutter-love-my-simple-home


 Now that I have a spot to store all the shoes, I am thinking of buying these cute booties at Target

simple-solutions-to-hide-clutter-love-my-simple-home

Make sure you get your family on board with hiding their clutter.  It helps if everyone in the family is doing this, not just you.

simple-solutions-to-hide-clutter-love-my-simple-home

simple-solutions-to-hide-clutter-love-my-simple-home


If you don't have a built-in you can purchase a storage bench. I love this set from Wayfair, the set includes a hall tree, shoe bench, and accent cabinet!

Beachcrest Home Fairview Entryway Storage Set With Hall Tree, Shoe Bench, and Accent Cabinet from  Wayfair


simple-solutions-to-hide-clutter-love-my-simple-home


How to set a table printable

November 10, 2016, in
Do you stress when it comes to setting the table for the holidays or a formal gathering?  Don't worry I've got you covered with a sweet little printable that you can pin on your refrigerator and refer to it when needed.  This will take the guess work out for you and your guests will be impressed!
This post contains affiliate links


For your free printable clink on the link below
for personal use only please


Silver or Gold?  Which do you prefer to decorate with for the holidays?  Do you use both?  Or is it just one?  For Thanksgiving I prefer gold and for Christmas, I like to mix it up a bit.  I love the warmth of gold and the clarity of silver.

lovemysimplehome.com

This was by far the easiest repurpose project I have ever done! All I needed was a can of gold metallic spray paint to give these warn-out trophy parts a holiday feel.

BEFORE


I gave these babies two coats of spray paint and that was it!


Now I have a set of awesome candlesticks to use throughout the holiday season!


If you like this project you might enjoy reading my other posts on  repurposed trophies


© love my simple home · THEME BY WATDESIGNEXPRESS